Signing in
Open iet-field-office.pages.dev/field in Safari or Chrome and sign in with your work email. Then Share → Add to Home Screen so it's one tap. Can't get in? Email Kurtis.
Something wrong or confusing? Tap Feedback.
There's a Feedback button in the top bar of every screen. Tap it any time, type what happened — it automatically captures the screen you're on and sends it to us. No wrong answers; that's how the app gets better.
Your week — tap to expand
As you work · daily
Enter your crew's time
You enter time for your crew — they don't log in. Enter hours as worked; the office figures overtime.
▾
- 1Open Time from the home screen.
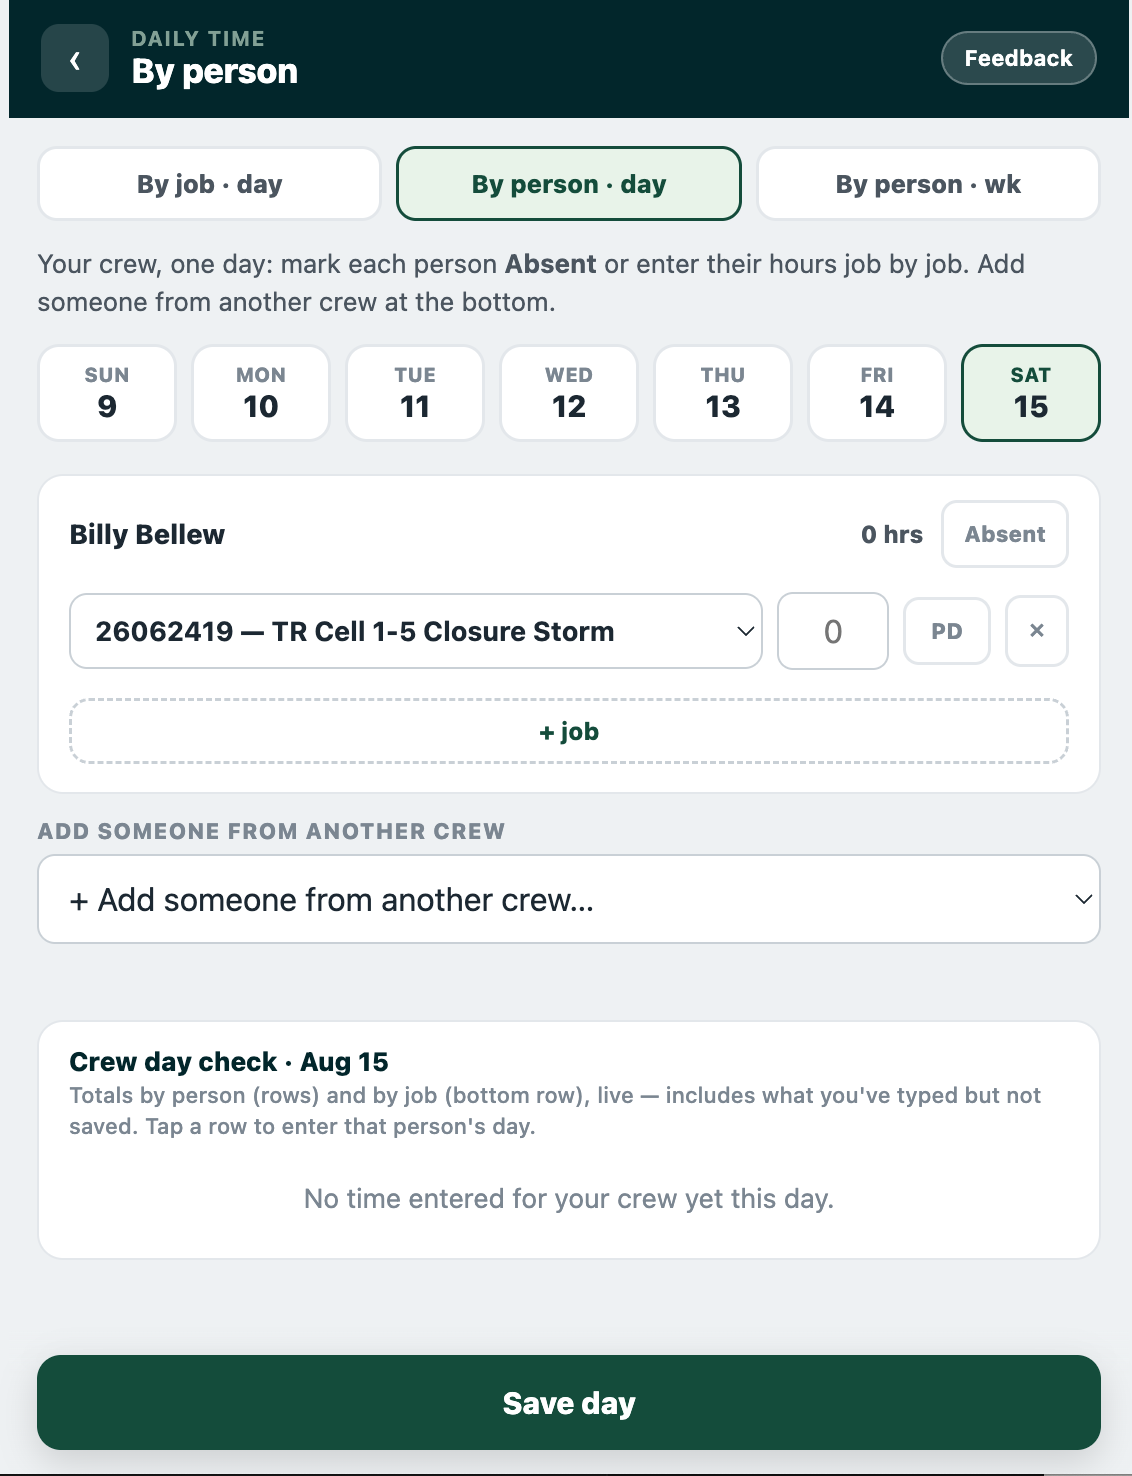
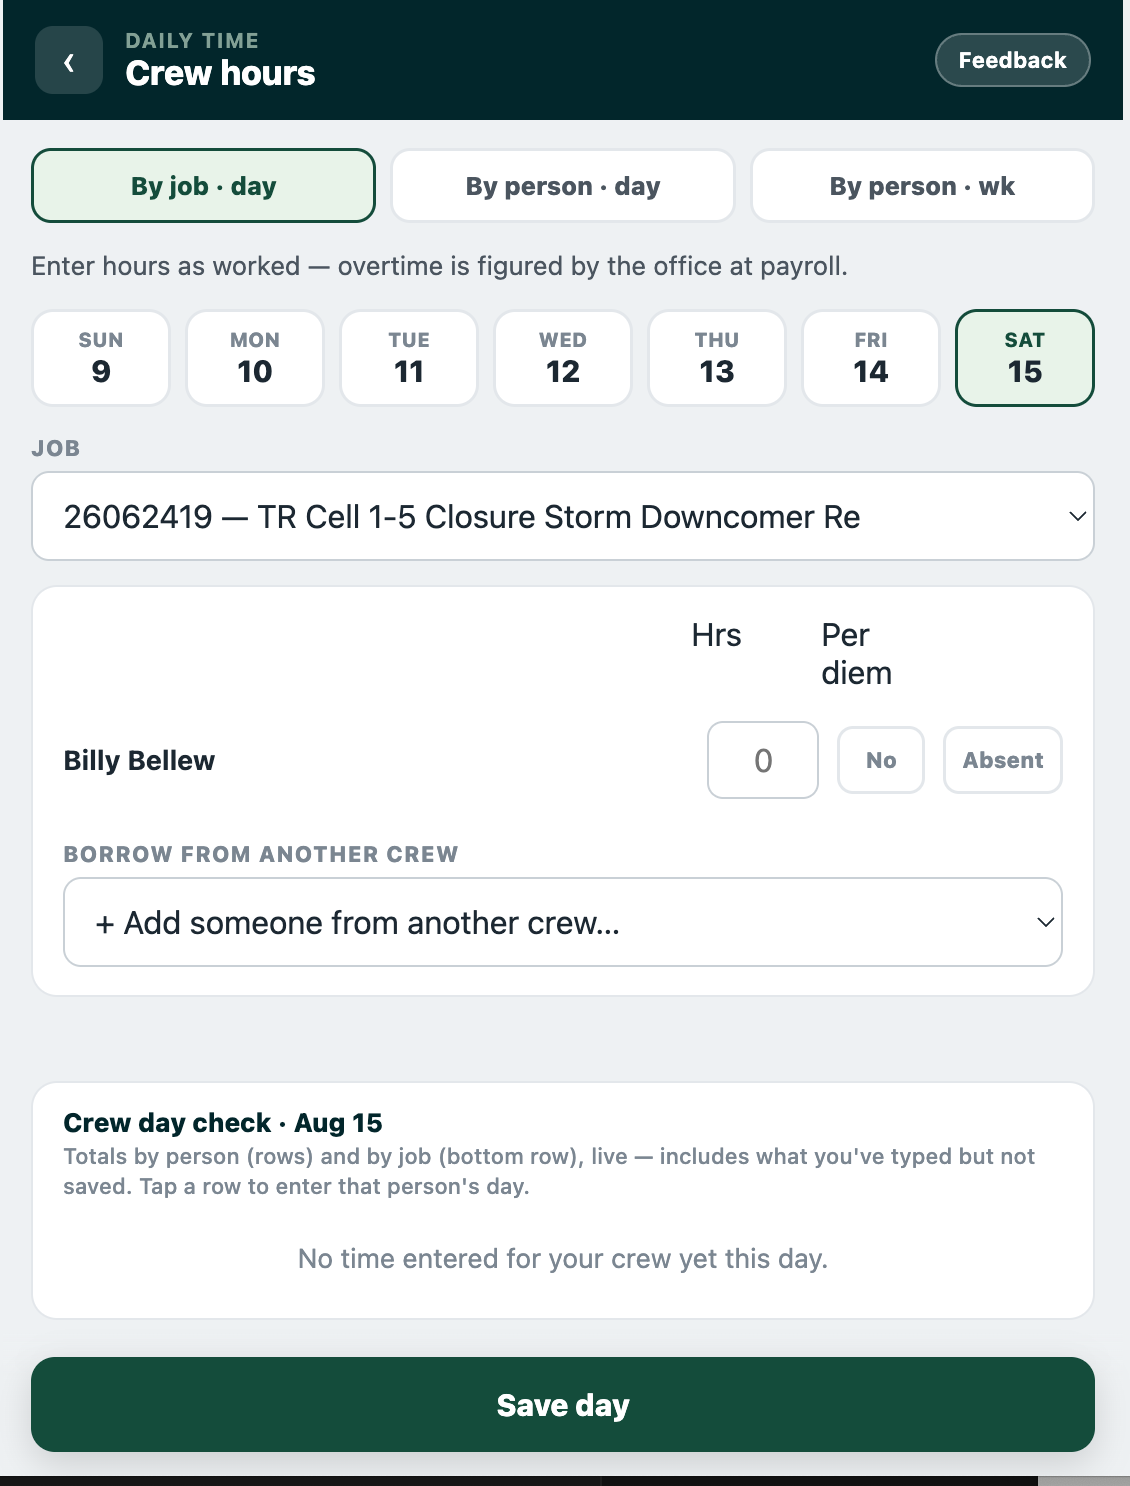
- 2Pick your entry style: By person · day (your whole crew for the day — one card per person, like the paper master sheet) or By job · day (pick a job + day, enter everyone's hours on that job).
- 3Type hours as worked — no overtime. Tap PD to add per diem on a job. Someone out? Tap Absent on their card instead of hours.
- 4The Crew day check at the bottom shows everyone × every job for the day — a quick scan tells you if anyone's missing time before you leave the screen.
- 5Enter time every day — don't save it up for Monday. Monday is just for submitting (next step).
Screenshot needed: field-timekeeping-day-by-person.png
The Time screen in By person · day view — the crew cards for one day, hours entered job-by-job, with the Absent toggle visible.
The Time screen in By person · day view — the crew cards for one day, hours entered job-by-job, with the Absent toggle visible.
Screenshot needed: field-timekeeping-day-by-job.png
The Time screen in By job · day view — one job and day selected, hours per person filled in.
The Time screen in By job · day view — one job and day selected, hours per person filled in.
Every Monday
Submit payroll for last week
Review the week and send it to the office by the Monday cutoff.
▾
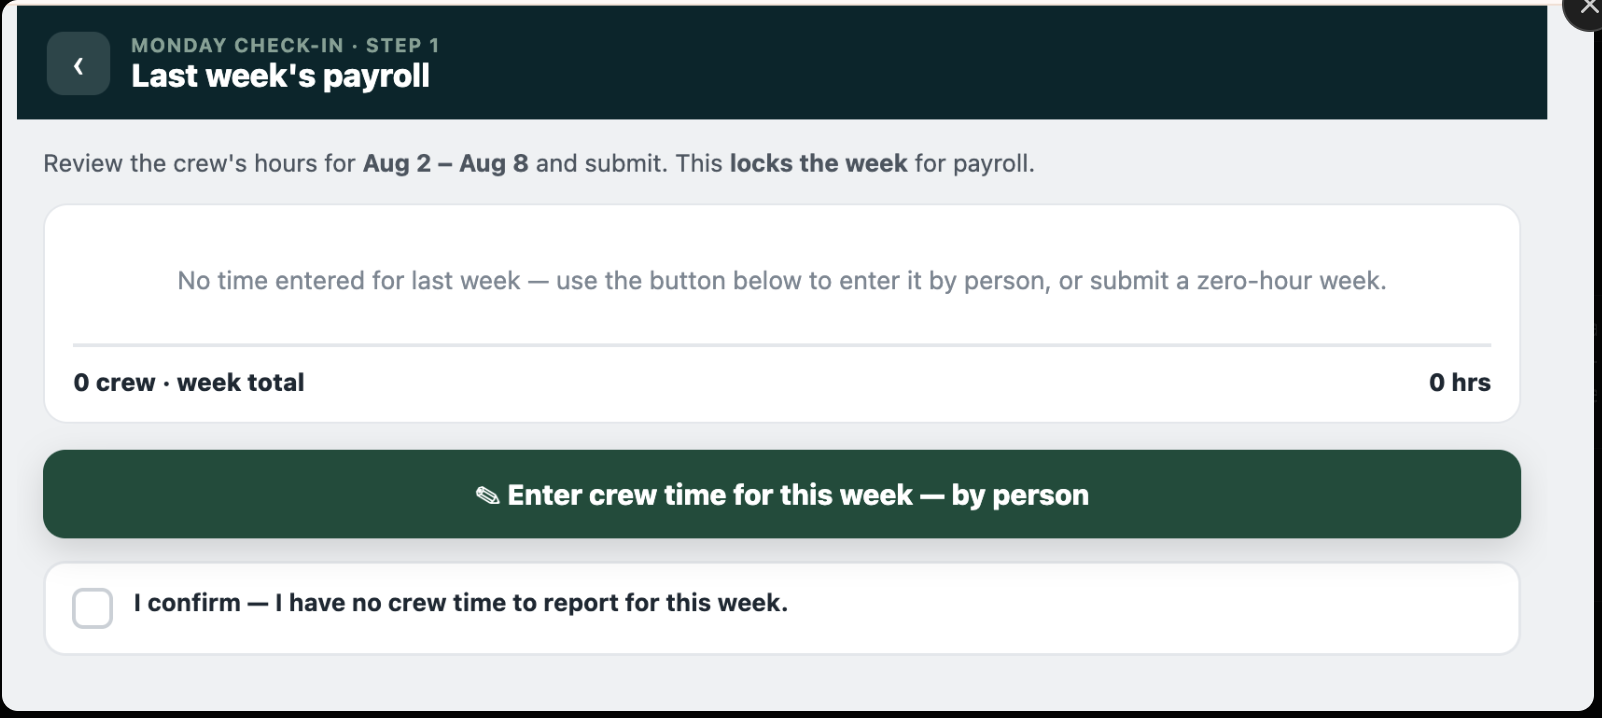
- 1The home screen nudges you until payroll is submitted — tap it.
- 2Review the week. You can fix any hours right on this screen.
- 3Tick the confirmation and tap Submit.
- 4The office reviews and locks the week. After it's locked, that week is read-only — text the office if something needs to change.
Screenshot needed: field-payroll.png
The Monday payroll review / submit screen — the week's hours with the confirmation tick and the Submit button visible.
The Monday payroll review / submit screen — the week's hours with the confirmation tick and the Submit button visible.
Every Monday
Check in on each active job
A quick note on how each job is really going — this is how the office knows.
▾
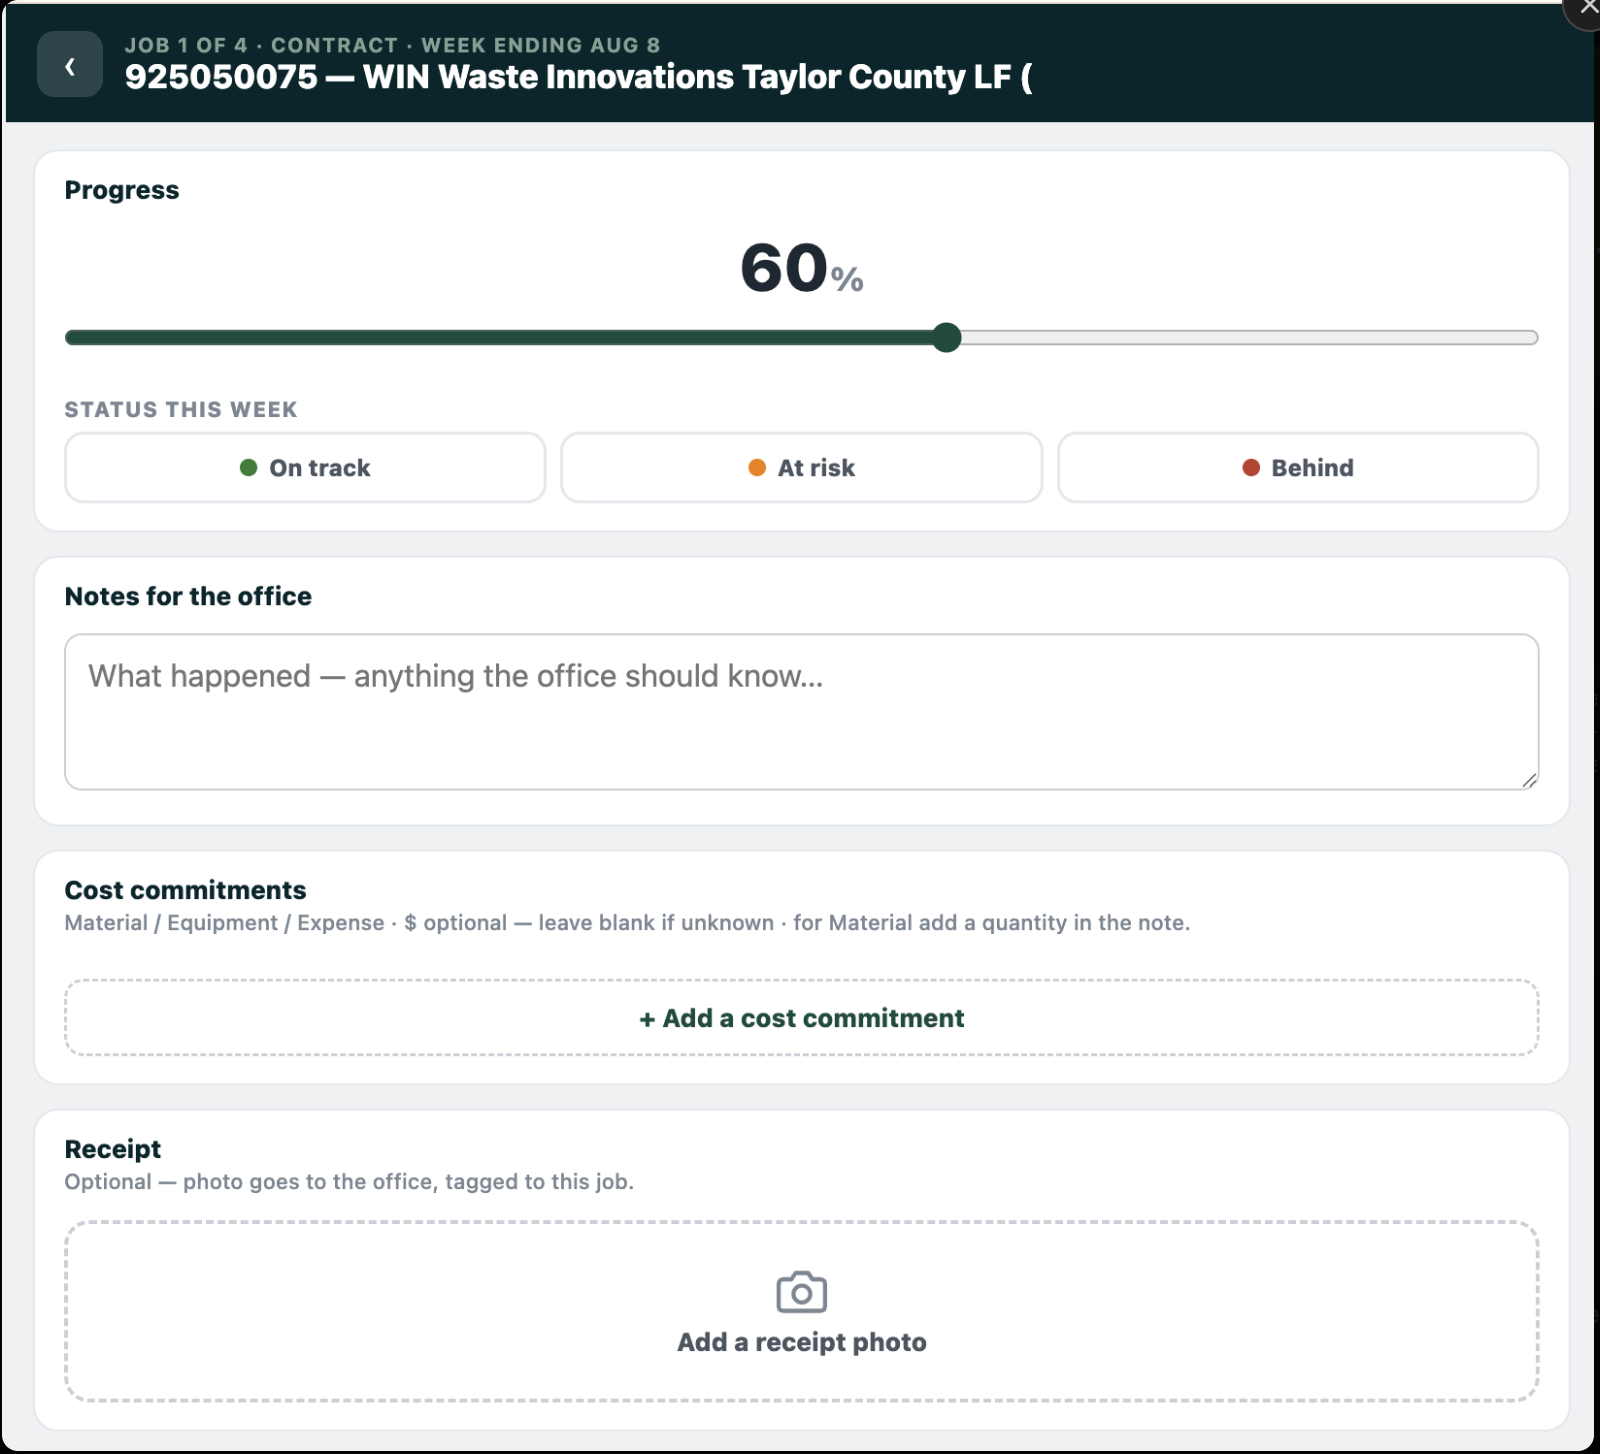
- 1For each active job, set the % complete slider and a status.
- 2Add a short note for the office if anything's off. Service jobs ask for days worked instead.
- 3At 100% you'll get the "ready to close?" question — answer it if the job's done.
Screenshot needed: field-checkin.png
The weekly check-in screen for one job — the % complete slider, status, and the note box.
The weekly check-in screen for one job — the % complete slider, status, and the note box.
When you order
Log a commitment
Ordered material, equipment, or a rental? Log it so the office sees it before the bill.
▾
- 1On the job, tap Log a commitment.
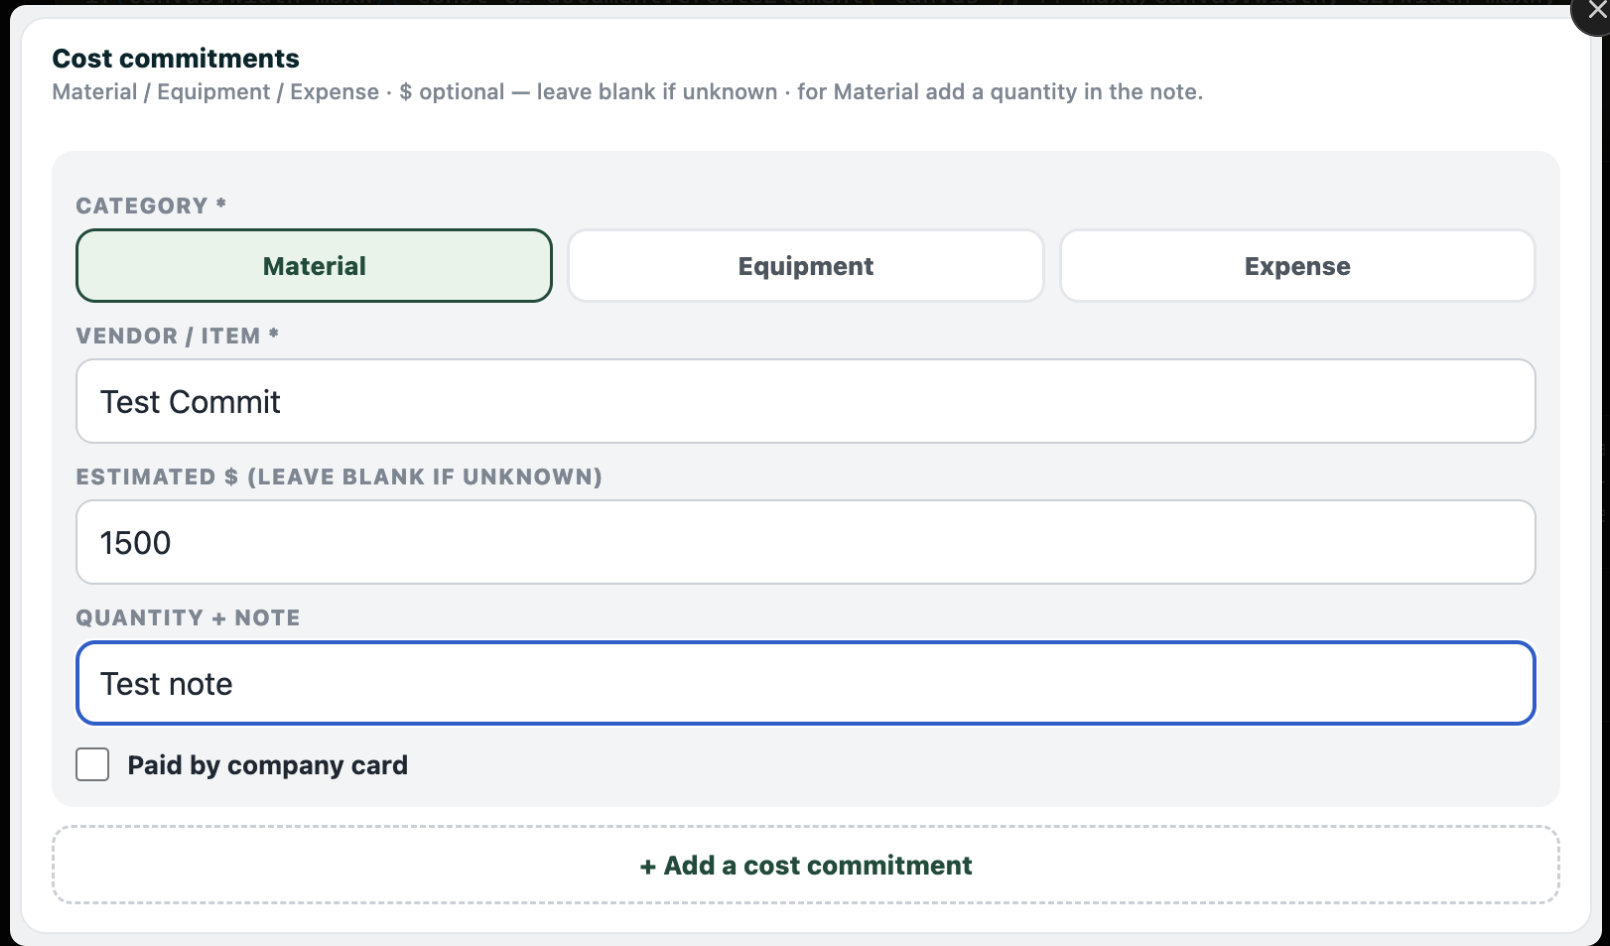
- 2Enter the vendor, rough dollars, quantity, and whether it went on a card.
- 3Save. The office matches it to the real cost when the bill lands.
Screenshot needed: field-commitment.png
The log-a-commitment form filled in (vendor, estimated $, quantity, card toggle).
The log-a-commitment form filled in (vendor, estimated $, quantity, card toggle).
When you get a receipt
Add a receipt
On your phone: snap a photo. On a computer: upload an image, PDF, or saved email. Do it right away so it doesn't get lost.
▾
- 1Tap Receipt — take a photo on your phone, or on a computer upload the file (image, PDF, or a saved email).
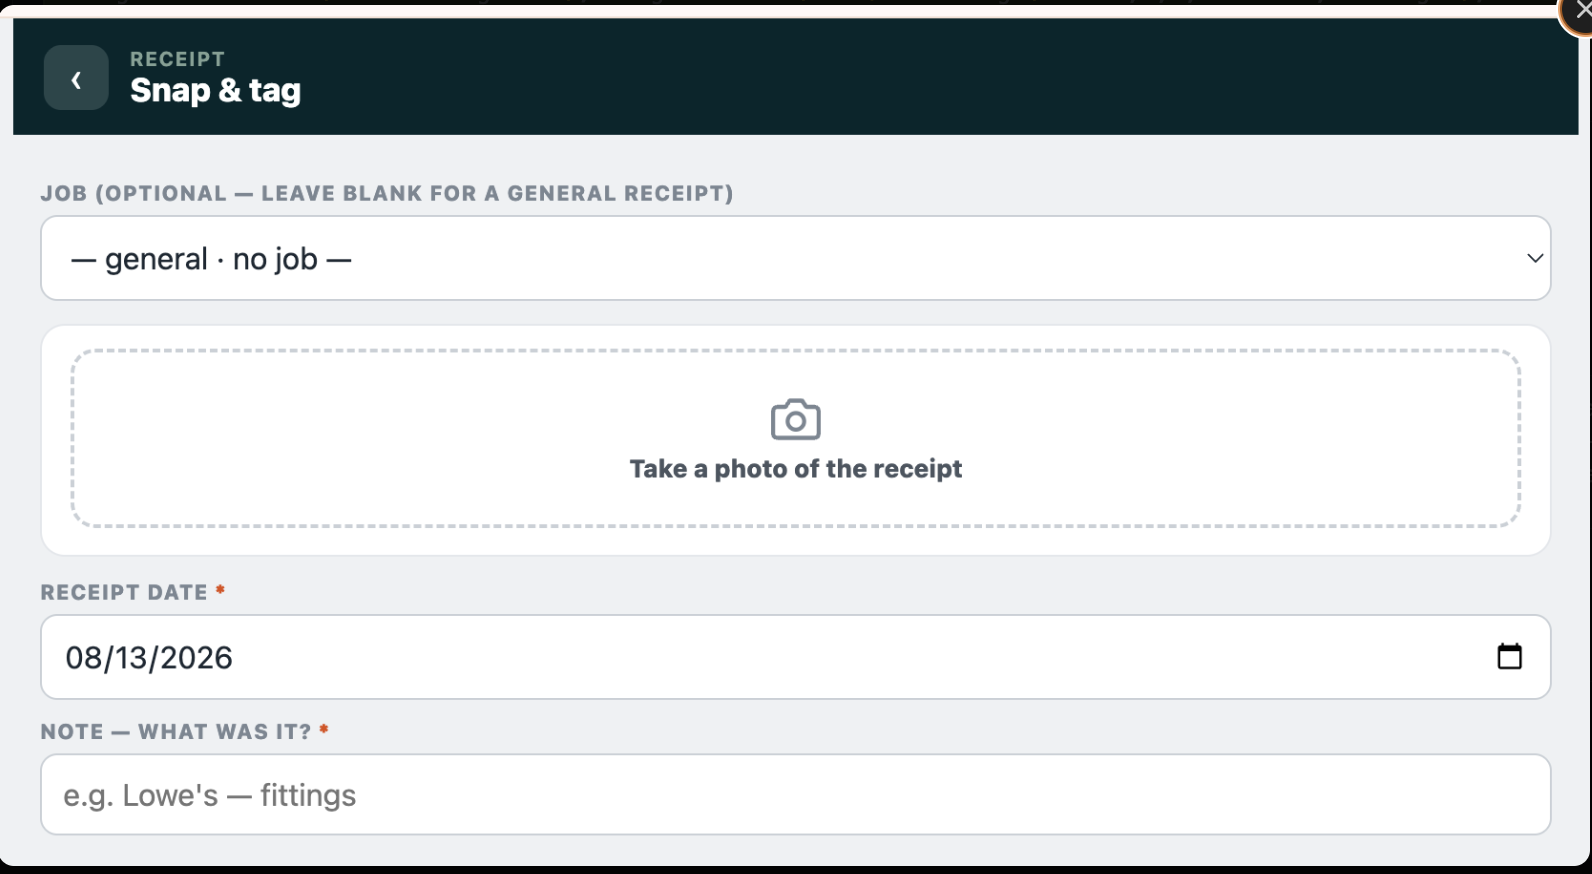
- 2Set the date and a short note (what it was for).
- 3Pick the job — or leave it blank for a general receipt. Save.
- 4For now: road expenses (gas, food, field supplies) go here. Big vendor receipts and PO paperwork keep going through the current process.
Screenshot needed: field-receipt.png
The receipt screen with a photo added, the date, note, and job picker.
The receipt screen with a photo added, the date, note, and job picker.
When a job starts
Start a job (placeholder)
Jobs still start in Smartsheet — this creates a placeholder so you can book time today. The office assigns the official number.
▾
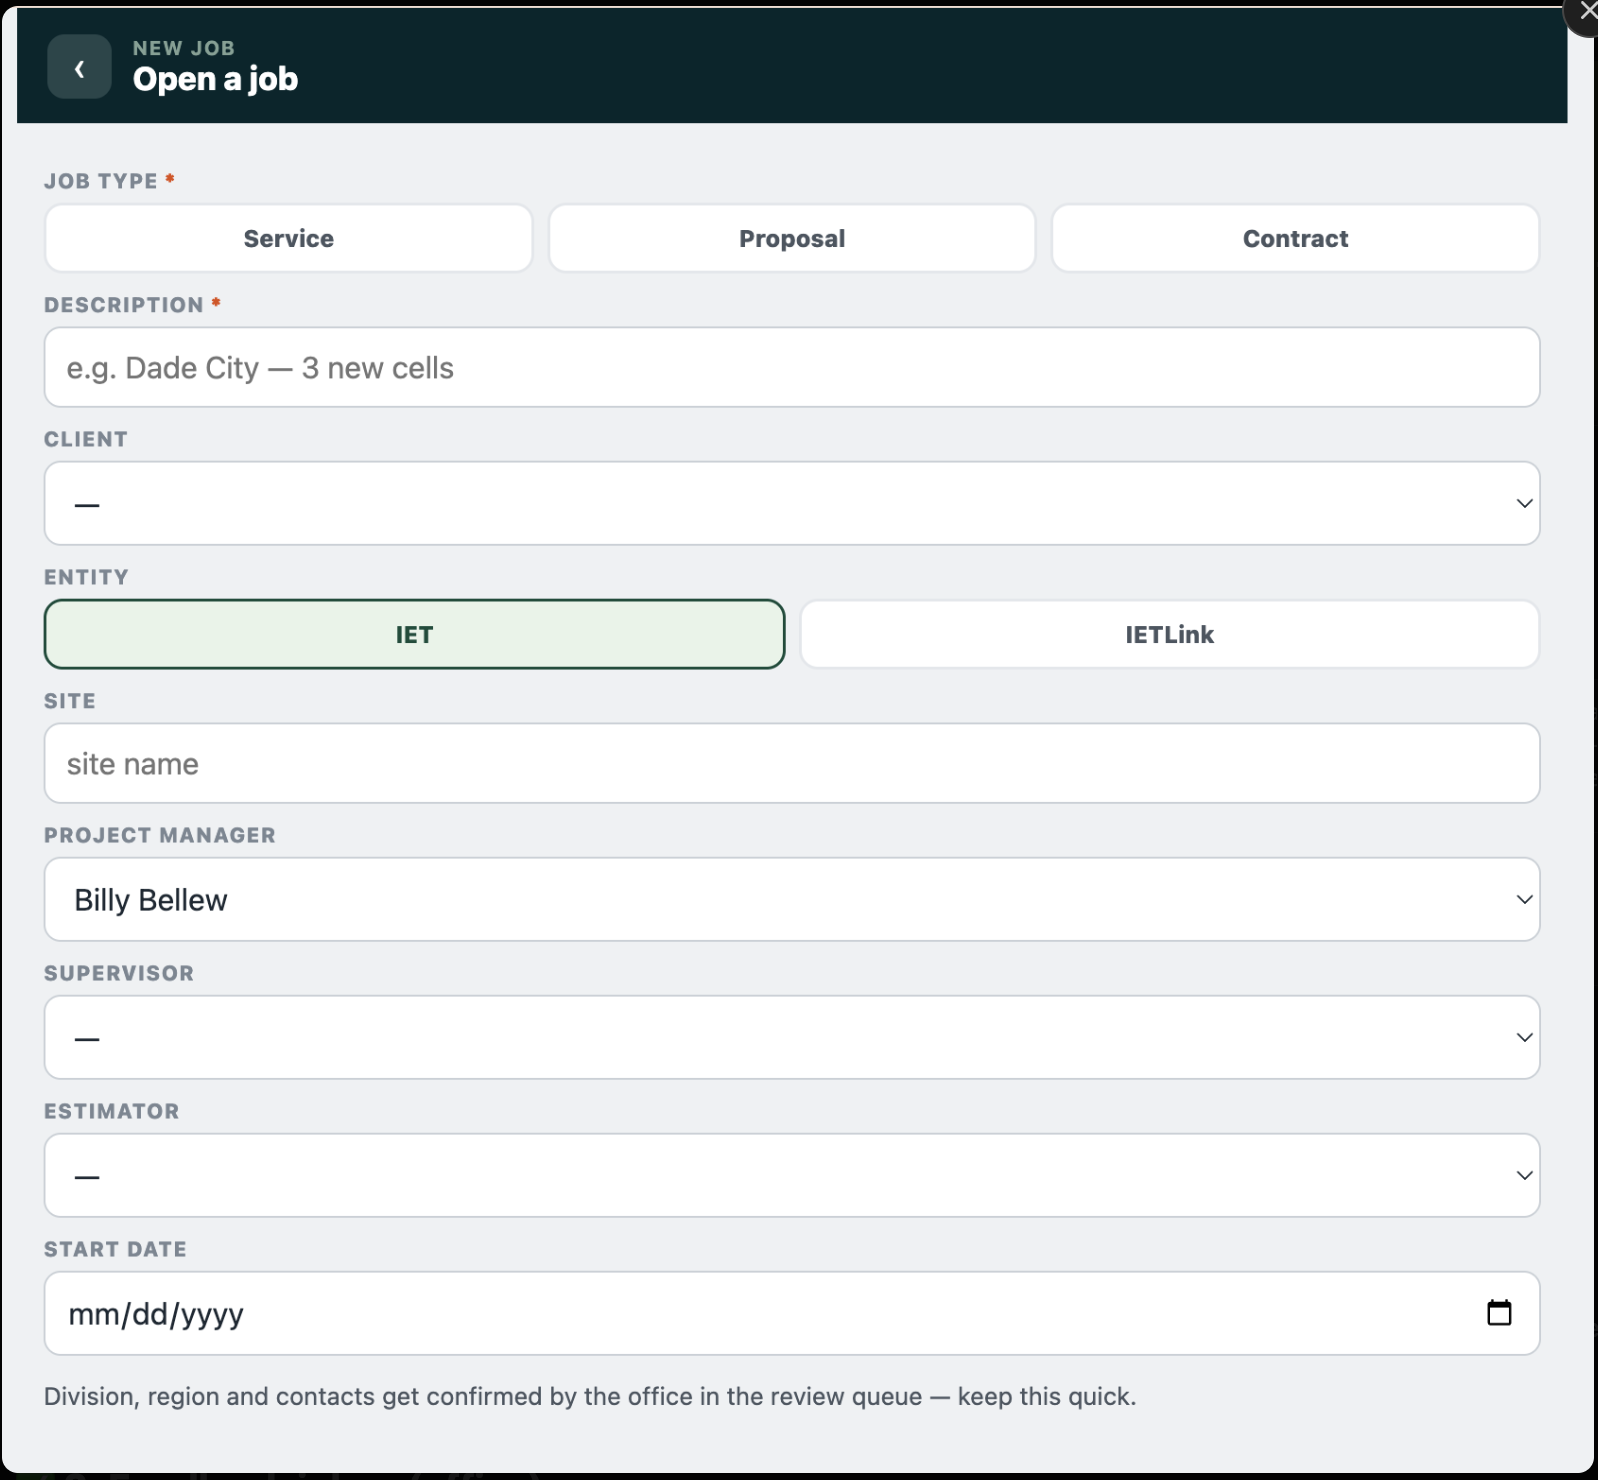
- 1Tap Start a job and enter the basics — job description (what job), site name (where), and description of work (what you're doing — the office uses this for invoicing).
- 2Save — you can book time to it immediately. The office assigns the Smartsheet job number and confirms division, region, and contacts in their review queue.
Screenshot needed: field-openjob.png
The light open-a-job form on the field app.
The light open-a-job form on the field app.
Good to know
A few things during the pilot
• No email alerts yet — the office sees your submissions in the app. • Keep doing your current process alongside the app until we say otherwise — nothing here replaces it yet, and test data gets reset before go-live, so use it freely.
Need a hand?
Anything in the app — tap Feedback. It captures your screen and sends it to us.
Can't sign in? Email kwh@bisoncfo.com.